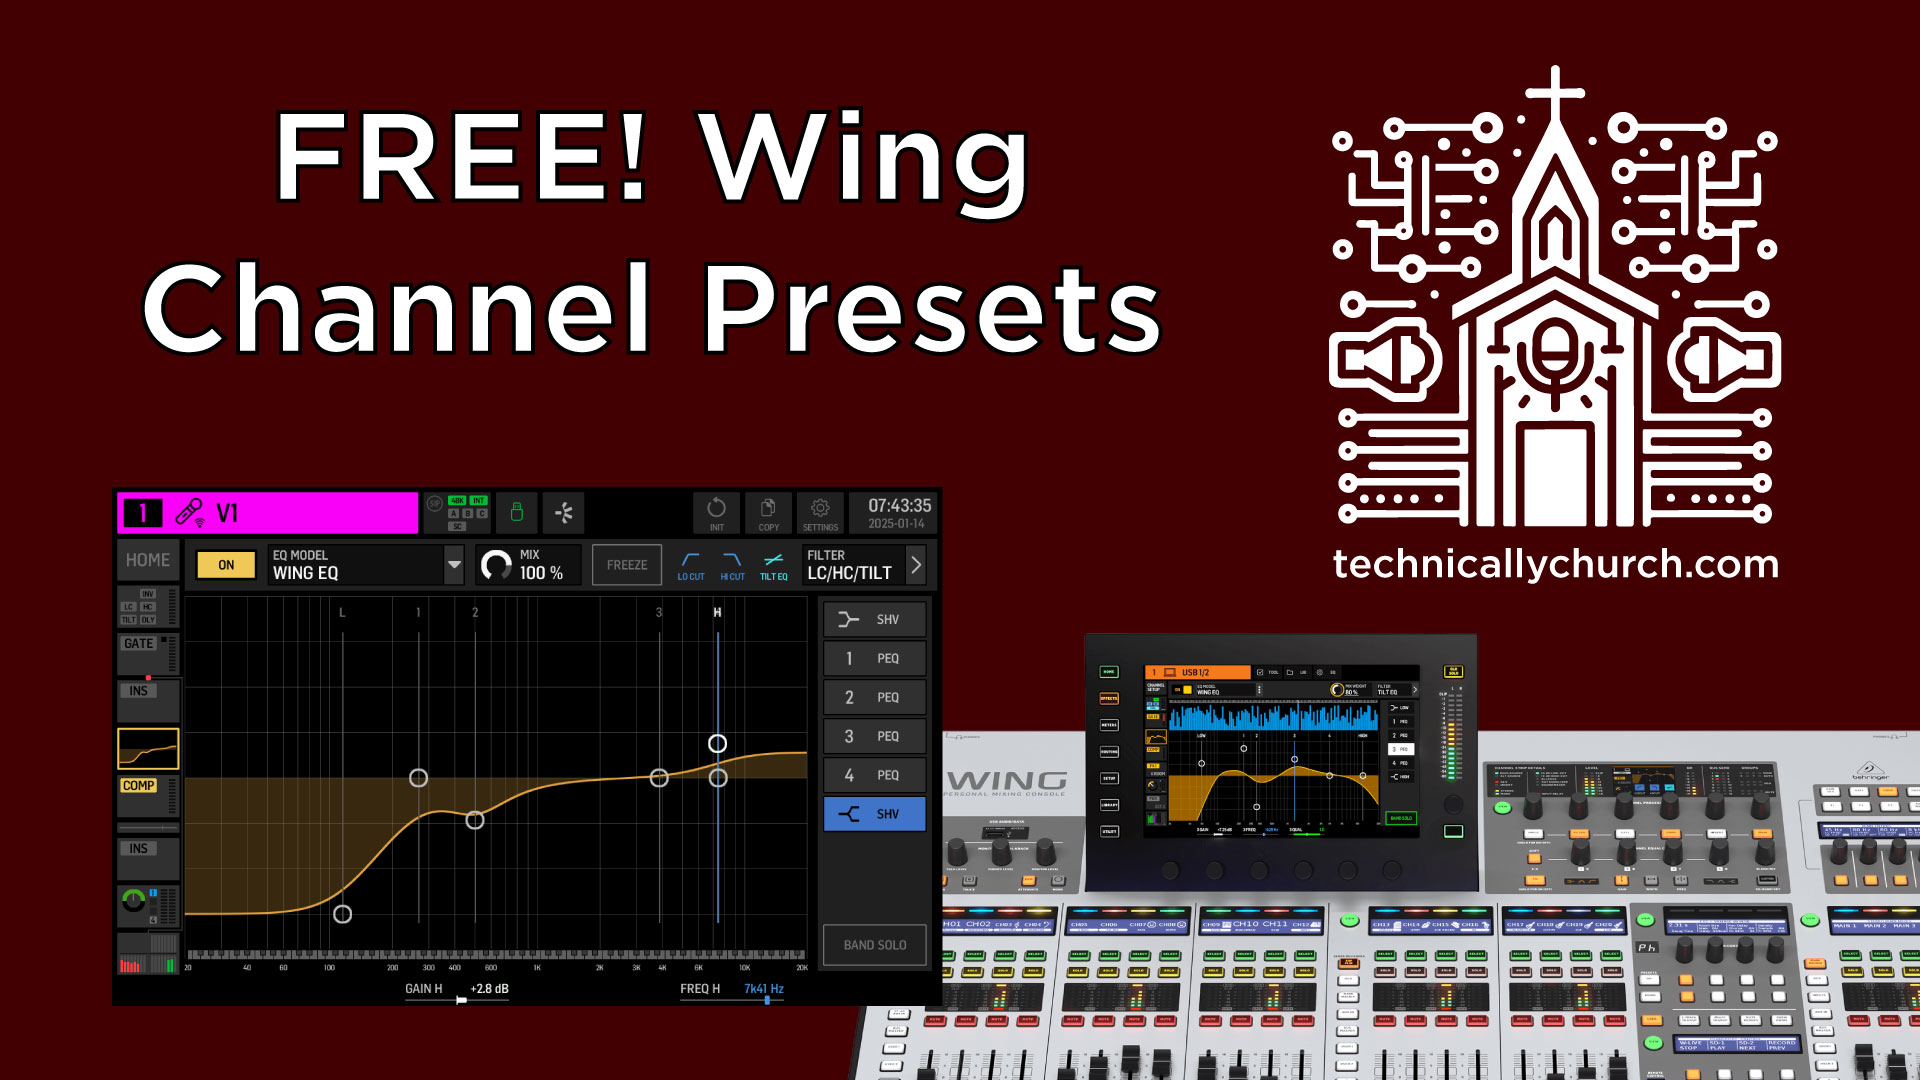
FREE Behringer Wing Channel Presets + How to Use Them!
How to Load and Use Channel Presets on the Behringer Wing: A Beginner’s Guide
When it comes to using the Behringer Wing, understanding channel presets can simplify the mixing process, especially for beginners. In this guide, we’ll take a closer look at how to load and use channel presets—starting from downloading them and placing them on your console, to applying them to your channels. These presets are designed to provide you with a starting point for EQ and other channel settings.
While these presets won’t produce a polished mix or create a perfect sound for your instruments, they can serve as excellent learning tools for exploring EQ and channel parameters. Let’s dive into the process step by step.
Downloads
*Affiliate Links (Help support my channel just by clicking and buying anything you need!)
Behringer Wing
Behringer DL32 Stage Snake
Wing Dante Card
USB Drives that work with the Wing – Option 1 | Option 2
Step 1: Understanding the Purpose of Presets
Before we start, keep these key points in mind:
- Presets are starting points: These presets are not a one-size-fits-all solution. They won’t fix your mix or guarantee the perfect sound, but they will provide you with parameters to explore and adjust based on your needs.
- Learn as you go: Presets contain basic settings for EQ, filters, gates, and compressors. By analyzing and tweaking these settings, you can learn how different processors affect your sound.
- It’s about customization: Use these presets as templates and make adjustments that suit your particular style, room acoustics, or instrument requirements.
Step 2: Downloading the Presets
To download the channel presets, follow these steps:
- Download Link: FREE Behringer Wing Channel Preset Download
- Download the files: Save the preset files onto your computer. These files contain pre-configured EQ and channel settings for various instruments, vocals, or sound sources.
- Transfer to a USB stick or connect your Wing to your computer:
- Option 1: Copy the preset files onto a USB stick.
- Option 2: Plug your Behringer Wing into your computer via the USB port and enable Data Mode on the console.
Step 3: Loading Presets on the Behringer Wing
Once you’ve transferred the preset files onto a USB stick or connected your Behringer Wing, follow these steps to load a preset onto a channel:
- Insert the USB stick into the Wing: Insert the USB stick into the USB port on the console.
- Access the USB library:
- Navigate to the Library menu on the Behringer Wing.
- From there, select USB.
- Select a channel to edit:
- For this example, we’ll use Channel 1.
- First, mess up the current EQ settings so you can see the effects of changing to a preset. You might boost or attenuate frequencies randomly to create a dramatic change.
- Choose the desired preset:
- Find the vocal, kick drum, or other preset files displayed within the Library.
- Select the preset that matches the channel’s sound source (e.g., “Vocal_Preset” for a vocal mic or “Kick_Preset” for a bass drum).
- Choose import options:
- When you click on a preset, the right-hand side of the screen will display parameters you can select to import.
- Options include EQ, Filters (low cut/high cut), Gates, and Compressors.
- Deselect parameters you don’t want to import by toggling them off. For example, you may only want to load EQ and filters but not gates or compressors.
Step 4: Applying the Preset
- Load the chosen parameters:
- Once you’ve selected the desired settings, click Load.
- The Wing will ask for confirmation. Press Yes to finalize.
- Verify the changes:
- Go back to the channel you’ve edited.
- The EQ and other selected parameters should now reflect the imported preset configuration.
Step 5: Customizing the Preset
Presets provide a solid foundation, but you’ll most likely need to adjust the settings further to suit your live mix or recording needs. Here are a few areas to focus on:
- EQ: After loading the preset, listen to the channel and adjust the EQ frequencies to better match the instrument or vocal in your context.
- Filters: Make sure the low cut (high-pass filter) or high cut (low-pass filter) settings are appropriate for the sound source. For example, you might want to cut frequencies below 80Hz for vocals to remove rumble and unwanted low-end noise.
- Dynamics: If you loaded gates and compressors, adjust the threshold, ratio, attack, and release based on the dynamics of the sound.
Additional Notes
- Flexibility of presets: You can load presets onto any channel, even if they weren’t designed for that specific source (e.g., loading a kick drum preset onto a vocal channel). However, double-check the results, as using mismatched presets can lead to an overly processed or unnatural sound.
- Experiment and learn: Take time to study how the preset parameters (such as EQ boosts/cuts and filter slopes) impact the sound.
Related Posts
Transferring Files to/from Behringer Wing using USB Drive
Transferring Files to/from Behringer Wing using a Computer and USB Cable


Do you have channel presets for congas /percussion?
I do not at the moment.